
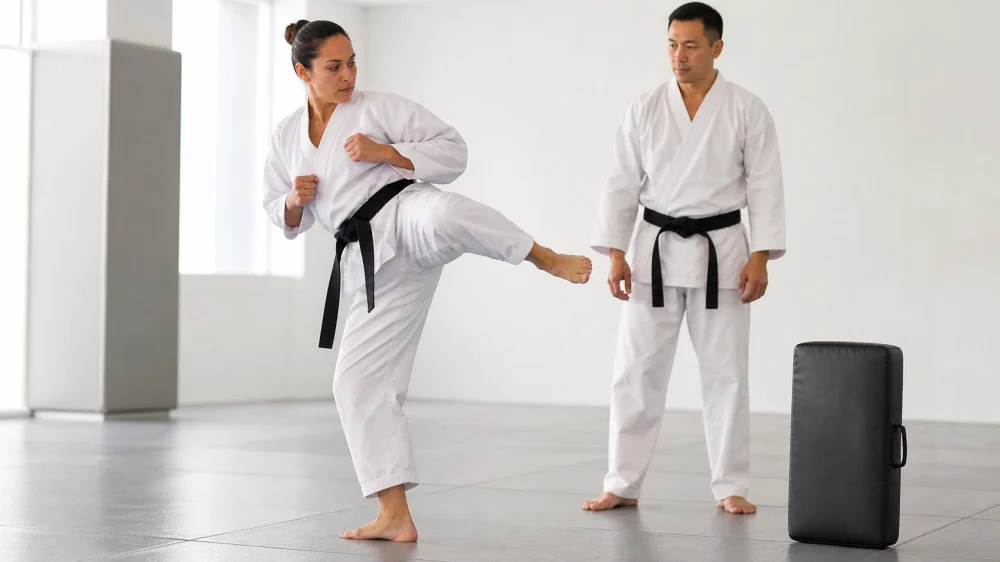
Tae Kwon Do Turning Kick: Build the Pivot Before Power
A turning kick can feel fast at the foot while the supporting leg, hips, and guard lag behind. That mismatch can strain the knee, spoil balance, and make partner work unpredictable. Build the movement in layers: stance, chamber, supporting-foot pivot, controlled extension, retraction, and a stable return. Speed and power come only after those pieces stay organized.
Quick answer
Learn the school’s turning-kick method from a qualified instructor. Start at low height and light effort. Establish stance and distance, lift the knee into the prescribed chamber, rotate the supporting foot so the hip can turn without twisting a planted knee, extend under control, retract along the same path, and return to balance with the guard intact. Stop if the knee, hip, ankle, or back hurts; do not force range or copy a different style’s mechanics without instructor guidance.
Budo Martial Arts Studio / budo martial arts studio
Ewing TownshipMercer CountyNew Jersey
9 Scotch Rd, Ewing Township, NJ 08628, USA
Set stance, guard, and distance
Use the stance, target surface, and kicking surface taught at your dojang. Tae Kwon Do organizations and schools may cue a roundhouse or turning kick differently. The target, ruleset, athlete, and drill determine how open the hip becomes and where the foot lands.
Stand on a clean, dry, continuous training surface with enough clearance for the full arc of the leg. Remove bags, bottles, jewelry, and other hazards. Face away from walls, mirrors, spectators, and equipment. Warm up through general movement and instructor-selected skill preparation.
Choose a target height that does not require leaning, jumping, or forcing the hip. The stance should let you lift the kicking knee without hopping. Keep hands in the school’s guard position, eyes on the target, and jaw relaxed.
Champions Martial Arts Plainview / champions martial arts plainview
PlainviewNassau CountyNew York
10 Washington Ave, Plainview, NY 11803, USA
Understand the supporting-foot pivot
The supporting foot is not merely an anchor. As the kicking hip turns, the support foot and leg must accommodate that rotation. If the foot sticks to the floor while the hips rotate, torque can collect at the knee.
Under your instructor’s supervision, practice a small pivot with no kick. Shift weight onto the ball of the support foot without lifting the entire foot high, rotate to the angle the instructor specifies, let the knee track consistently with the toes, and return with control. The heel may travel as the body turns, but the exact amount depends on the technique and individual structure.
A pivot is not a spin on a locked leg. Keep the support knee responsive rather than rigid, the torso stacked, and the sole in contact enough to control balance. Footwear and mat grip change friction; follow the facility’s uniform rules.
Practice the kick in sequence
- Set a stable stance and guard at the correct distance.
- Transfer weight to the supporting leg without collapsing the hip.
- Lift the kicking knee into the school’s chamber.
- Pivot the supporting foot as the hips turn toward the target.
- Extend only within controlled range and use the approved striking surface.
- Retract promptly back to the chamber.
- Place the foot in the instructed stance and recover the guard.
Pause after each stage when learning. If balance disappears during the chamber, lowering the leg is better than forcing the extension. Keep the standing knee from diving inward and avoid throwing the shoulders backward to manufacture height.
Use progressive drills
Supported chamber: With instructor approval, place fingertips lightly on a stable barre or wall outside the leg’s arc. Lift and lower the chamber without leaning heavily on the support. The support is for feedback, not for forcing flexibility.
Pivot marks: Use a plain removable floor marker placed by the instructor to show start and finish direction. Pivot slowly with no kick. Do not put tape on a mat unless the school allows it.
Chamber–pivot–return: Lift, pivot, pause, retract, and set down without extending. This isolates balance and rotation.
Low air kick: Add a short controlled extension below waist height, staying well clear of people and objects. Do not snap the knee into its end range.
Hand target: A qualified holder presents a light pad at an agreed height and distance. Begin with touch contact and reset after every repetition.
Correct common errors
Planted heel and turning hip: Reduce range and rehearse the pivot separately. Ask the instructor to check the floor, foot angle, and timing.
Knee drops before extension: Lower the target and hold the chamber for a brief controlled pause. Do not chase height by swinging from below.
Shoulders lean away: Return to a smaller movement while keeping the head and ribs stacked over the supporting base.
Hands fall: Slow down and complete a guard check at chamber, extension, and recovery. A partner can cue “guard” without touching the kicker.
Foot lands uncontrolled: Emphasize retraction and choose a stance for the return before kicking. Power that prevents a safe recovery is premature.
Add pads and partner work safely
Agree on the technique, target, height, speed, contact, number of repetitions, and stop signal before starting. The holder should use approved equipment, stand in the instructor-taught position, brace without locking joints, and never surprise the kicker by moving the target mid-kick.
Begin with a stationary target and one kick per reset. Increase speed, movement, combinations, or contact one variable at a time. Keep other pairs beyond the complete kicking and pad-recoil zones.
Sparring adds timing, defense, contact, and rules that this technical drill does not cover. Use required protective equipment and direct instructor supervision. Never aim an unplanned turning kick at a partner.
Respect pain and training limits
Muscular effort and unfamiliar coordination are different from sharp, catching, unstable, numb, or increasing pain. Stop for pain in the supporting knee, kicking hip, groin, ankle, back, or another joint. Also stop for dizziness, chest pain, unusual shortness of breath, or a head impact.
Do not stretch aggressively or have a partner push the leg higher to “fix” the kick. Previous injury, surgery, joint instability, pregnancy, or other medical circumstances may require individualized advice from a healthcare professional and training modifications from the instructor.
After pain, swelling, a fall, or loss of function, do not test the injury with more kicks. Follow the school’s incident procedure and seek appropriate medical assessment.
Frequently asked questions
How far should the supporting foot turn?
There is no universal angle. It depends on the school’s technique, target, rules, and your structure. Ask the instructor to observe the whole leg.
Should I practice high kicks first?
No. Use a height that preserves pivot, posture, retraction, and balance. Height can progress later.
Can I hold a wall while kicking?
Only as an instructor-approved learning drill, with light support and a clear arc. It should not hide poor balance or force range.
Why does my support knee hurt?
Stop kicking. Technique, load, surface, mobility, or injury may contribute, but pain needs individual assessment rather than an online diagnosis.
Next steps
Ask your instructor to check one controlled low turning kick from stance through recovery. Spend a short block on support-foot pivots and chamber–pivot–return drills, then add a light pad only when balance and guard stay consistent. Record the cue that helped, not just the number of repetitions.
 Aikido of San Jose4.0 (7 reviews)
 Nikko Jujitsu School4.0 (9 reviews)
 Gracie Barra San Clemente Martial Arts4.0 (47 reviews)
 Karate Institute of America4.0 (4 reviews)
 Keweenaw Korean Martial Arts0.0 (0 reviews)
 Wing Chun School of Internal Arts5.0 (6 reviews)
 How to Execute a Jumping Roundhouse Kick to the Head
 How to Execute a Double Kick Combination in Sparring
 How to Perform a Flawless Axe Kick: A Step-by-Step Guide
 DIY Tae Kwon Do Training Equipment for Home Practice
 How to Increase Your Vertical Jump for Tae Kwon Do Flying Kicks
 The History of the Tae Kwon Do Peace Corps