
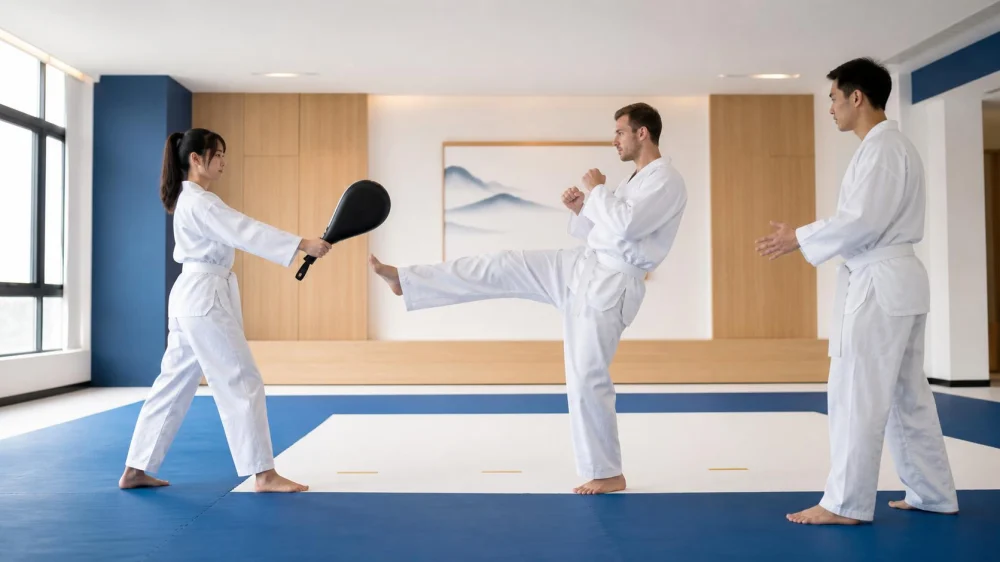
Tae Kwon Do Kicking Distance: Find Range Before Adding Speed
On this page
Quick answer
Kicking distance is the range where a Tae Kwon Do technique can reach the intended target with balance, correct contact surface, and control—without leaning, crowding, locking the joint, or chasing the pad. Find it at low speed using a stable target and instructor feedback. Mark the starting foot position, repeat the chamber and recovery, then add movement, speed, and power separately.
Range changes with the kick, target height, stance, partner movement, protective gear, flexibility, and school method. One floor mark is a drill reference, not a universal distance.
Budo Martial Arts Studio / budo martial arts studio
Ewing TownshipMercer CountyNew Jersey
9 Scotch Rd, Ewing Township, NJ 08628, USA
What kicking distance means
A front kick, round kick, side kick, back kick, and hook kick travel on different paths and use different contact surfaces. Each also needs room for the chamber, extension, recoil, and return to stance. Being close enough to touch a target is not the same as having usable range.
Too far often produces reaching, hopping, a dropped guard, incomplete contact, or loss of balance. Too close can jam the chamber, change the intended contact surface, collide with a holder, or force the supporting foot into an awkward position. Good distance lets the practitioner finish the technique and remain ready for the next instruction.
Champions Martial Arts Plainview / champions martial arts plainview
PlainviewNassau CountyNew York
10 Washington Ave, Plainview, NY 11803, USA
Set up the drill
- Use the kick, stance, height, and target specified by the instructor.
- Check the floor for traction, gaps, bags, walls, mirrors, people, and equipment.
- Warm up through the school’s normal progression.
- Place a stable pad or bag at an easy height and begin at low speed.
- Chamber, extend with control, touch or stop as instructed, recoil, and return without moving the target.
- Adjust the starting foot a small amount until posture and contact align.
- Mark that position temporarily and repeat several clean attempts before increasing demand.
Use video only if the school permits it and the camera can be placed outside the training area. A side view can show leaning and recovery, but it does not replace live coaching or reveal every joint position.
Progress with control
Change one variable at a time. First repeat the stationary technique. Then add a step, slide, pivot, or controlled partner movement. Add target height only within the practitioner’s active range; a higher pad is not a reward if the kick loses posture or contact control.
Increase speed after the route is consistent, and add power only on equipment and under instruction designed for it. Reset when fatigue changes the supporting foot, guard, breathing, chamber, impact, recoil, or landing. Clean repetitions at moderate demand build a clearer reference than repeated misses at maximum speed.
Work with a partner
The holder and kicker should agree on the kick, leg, height, contact level, number of repetitions, movement pattern, and stop cue. The holder presents the target exactly as taught, keeps fingers and face out of the strike path, and does not surprise the kicker by changing distance or angle.
Begin with no-contact positioning if either person is unsure. Stop for slipping, uncontrolled rotation, pain, dizziness, equipment movement, or an unexpected person entering the space. A holder should never use teasing, sudden withdrawal, or target changes to make a student “reach.”
Range checklist
- Kick, target, height, and contact level confirmed
- Floor and full strike path cleared
- Starting distance tested slowly
- Posture and guard maintained
- Correct contact surface aligned
- Knee and hip remain controlled
- Recoil and return completed without chasing
- Only one variable progressed at a time
Limitations
This article cannot coach a specific body, injury, rank, or technique. Joint limits, pain, recent injury, age, disability, and school curriculum require instructor or health-professional guidance. Do not use walls, furniture, people, or improvised hard objects as targets.
FAQ
Should my leg be fully straight at contact?
Follow the instructor’s technique and control cues. Do not force or lock a joint to reach a distant target.
Why do I fall forward?
The target may be too far, or chamber, supporting-foot, trunk, and recovery mechanics may need coaching. Slow down and shorten range.
Is closer always safer?
No. Crowding can jam a kick and create collisions. Use the distance that supports the specified technique.
Can I mark the floor?
Ask first and use a temporary method that does not change traction or damage the mat.
When should I add power?
Only when the instructor approves the target, holder, distance, technique, and contact level.
Evidence notes
The primary evidence for this drill is the school’s curriculum, instructor demonstration, and the practitioner’s repeatable movement under observation. Stable posture, specified contact surface, controlled recovery, and consistent target relationship are observable checks. Competition rules or online demonstrations do not replace a school’s teaching progression.
Conclusion
Effective range is built before it is tested at speed. Clear the space, start slowly, find the distance that preserves the whole technique, and progress one variable at a time with the instructor and partner aligned.
 Aikido of San Jose4.0 (7 reviews)
 Nikko Jujitsu School4.0 (9 reviews)
 Gracie Barra San Clemente Martial Arts4.0 (47 reviews)
 Karate Institute of America4.0 (4 reviews)
 Keweenaw Korean Martial Arts0.0 (0 reviews)
 Wing Chun School of Internal Arts5.0 (6 reviews)
 How to Execute a Jumping Roundhouse Kick to the Head
 How to Execute a Double Kick Combination in Sparring
 How to Perform a Flawless Axe Kick: A Step-by-Step Guide
 DIY Tae Kwon Do Training Equipment for Home Practice
 How to Increase Your Vertical Jump for Tae Kwon Do Flying Kicks
 The History of the Tae Kwon Do Peace Corps