
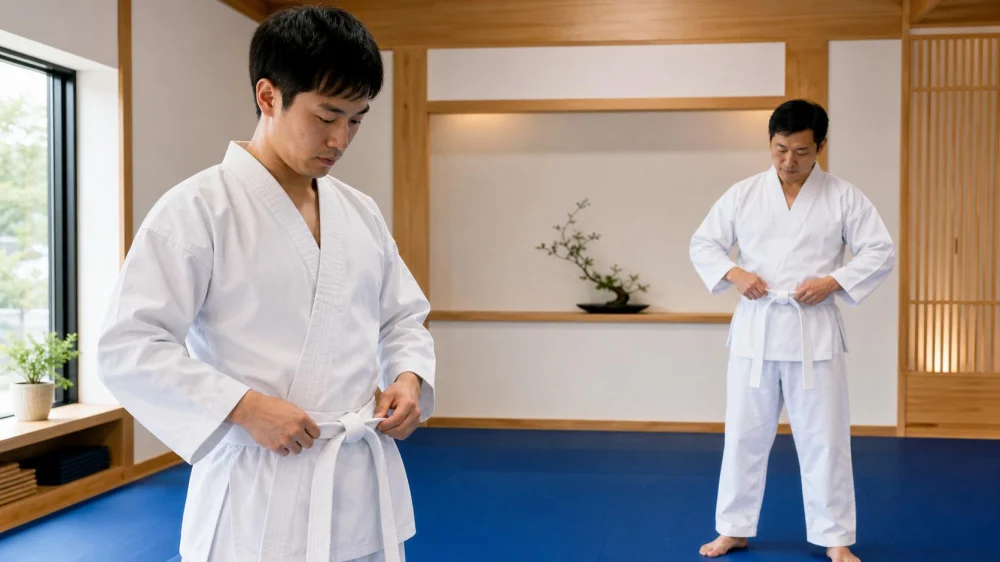
Tae Kwon Do Belt Tying: Practice Your School's Method
Table of contents
Quick answer
Ask your instructor to demonstrate the exact belt-tying method your school expects, then practice that sequence with a mirror or short checklist. Center the belt as taught, keep each wrap flat, make the approved knot, and check that the ends hang securely without reaching the knees. Retie off the main training area when possible. Do not replace school instruction with a random online variation.
Budo Martial Arts Studio / budo martial arts studio
Ewing TownshipMercer CountyNew Jersey
9 Scotch Rd, Ewing Township, NJ 08628, USA
Why belt-tying methods vary
Tae Kwon Do schools do not all wrap and knot belts in precisely the same way. One program may begin at the center and wrap both ends; another may start with one end and circle the waist. A school may prefer a single visible layer across the back, a specific knot orientation, or rules for where rank markings face.
Those differences do not necessarily mean one school is careless. They can reflect curriculum, organization, uniform design, or local tradition. The useful goal for a student is consistency with the method currently taught in that dojang and required at its events.
Champions Martial Arts Plainview / champions martial arts plainview
PlainviewNassau CountyNew York
10 Washington Ave, Plainview, NY 11803, USA
Learn the sequence from your instructor
Watch from the front and, if possible, from behind. Ask the instructor to pause at the starting position, first wrap, crossover, and final knot. Notice which end moves, which layer sits on top, and where any label, stripe, or embroidered end should finish.
Use a simple verbal sequence based on the demonstration, such as “center, wrap, flatten, cross, tuck, knot.” The exact words matter less than matching the instructor's movements. Ask permission before recording a close-up demonstration and frame only the instructor's hands and belt.
Prepare the dobok and belt
Tie the jacket or fasteners as designed and smooth the uniform so bunched fabric does not distort the belt. Remove keys, phones, and bulky items from pockets. Find the belt's midpoint or starting end according to the school method, and untwist the full length before wrapping.
Check that the belt matches your awarded rank and is in usable condition. Fraying ends, a separating seam, a damaged fastener, or an unreadable required identification may need attention. Do not cut, re-mark, or replace a belt without asking how the school handles sizing and rank details.
Practice slowly without inventing steps
- Stand naturally with the dobok closed and the belt fully untwisted.
- Place the starting point exactly where the instructor showed you.
- Wrap at waist level while keeping each layer flat rather than rolled.
- Pause before the knot and compare the lengths of the two ends.
- Complete the demonstrated crossover, tuck, and final pull.
- Undo the belt completely and repeat instead of hiding a mistaken layer.
Begin at walking speed. Once the steps are reliable, practice with your eyes on the horizon and fewer mirror checks. The goal is a calm repeatable habit, not winning a race to dress.
Check the knot and fit
The belt should stay secure through normal stances and controlled movement without restricting breathing. It should lie flat across the waist, and the knot should sit where the school expects. The hanging ends should be reasonably even unless rank markings or the taught method create an intentional difference.
Test with a few easy chambering movements, turns, and arm motions before class begins. If the belt slides, loosens immediately, or hangs low enough to catch a knee or foot, stop and retie it. Do not add safety pins, clips, hidden wire, or an improvised second knot without instructor approval.
Retie without disrupting class
If the belt loosens, step away from partner contact and follow the instructor's etiquette for adjusting the uniform. Some schools ask students to turn away from the flags or front of the room; others simply direct students to the edge of the mat. Learn the local custom instead of guessing.
Signal a partner before pausing and keep loose belt ends controlled while moving out of the drill space. If the knot repeatedly fails, ask for help after the exercise rather than stopping the same group many times. The belt may be the wrong length, worn out, or tied with one reversed step.
Belt-tying practice checklist
- The method comes from the current instructor or school handbook.
- The dobok is closed, smooth, and free of pocket objects.
- The correct starting point or midpoint is identified.
- Every wrap lies flat without twists.
- The crossover and tuck match the demonstrated sequence.
- The final knot is secure and oriented as taught.
- The ends are controlled and the rank markings face correctly.
- A few easy movements do not loosen or shift the belt.
Limits and school-specific details
This guide explains a learning process, not one universal knot. Uniform standards, belt widths, rank markings, ceremonial practices, and competition inspection rules vary by school and organization. Current instructor direction and event documents take priority.
Children or students with limited hand dexterity may need a slower demonstration, visual step card, adaptive teaching, or appropriate assistance. Ask the instructor how help can be provided while preserving the student's participation and the school's uniform requirements.
Frequently asked questions
Should both belt ends be exactly the same length?
They are often close, but the school method and placement of rank markings may affect the result. Ask what your instructor considers correct rather than repeatedly tightening for perfect symmetry.
Why does my knot loosen during kicks?
A twisted wrap, reversed tuck, loose first pull, unsuitable belt length, or worn material may be responsible. Demonstrate the problem to an instructor before adding an extra knot.
Can I learn from a video online?
A video can help only when it shows the same method your school uses. Get the sequence verified by your instructor first; otherwise, a polished tutorial may teach a different convention.
Where should the knot sit?
Many schools center it at the front, but follow the placement and uniform fit your program teaches. A knot that shifts may indicate an uneven wrap or loose tension.
Sources and verification
- Your instructor's live demonstration and the school's current student handbook are the primary sources for the local tying method.
- The belt manufacturer's care and sizing information can help identify an unsuitable or damaged belt.
- World Taekwondo: Current Rules and Documents provides event-level uniform and competition materials when applicable.
Conclusion and next steps
Ask for one clear demonstration, turn it into a short sequence, and repeat it until every wrap stays flat and the knot survives easy movement. A neatly tied belt is less about copying a universal picture than showing that you can follow your school's method with care and consistency.



 Aikido of San Jose4.0 (7 reviews)
 Nikko Jujitsu School4.0 (9 reviews)
 Gracie Barra San Clemente Martial Arts4.0 (47 reviews)
 Karate Institute of America4.0 (4 reviews)
 Keweenaw Korean Martial Arts0.0 (0 reviews)
 Wing Chun School of Internal Arts5.0 (6 reviews)
 How to Execute a Jumping Roundhouse Kick to the Head
 How to Execute a Double Kick Combination in Sparring
 How to Perform a Flawless Axe Kick: A Step-by-Step Guide
 DIY Tae Kwon Do Training Equipment for Home Practice
 How to Increase Your Vertical Jump for Tae Kwon Do Flying Kicks
 The History of the Tae Kwon Do Peace Corps