
- 1- The Importance of Tying Your Tae Kwon Do Belt Correctly
- 2- Step-by-Step Instructions on How to Tie Your Tae Kwon Do Belt
- 3- Common Mistakes When Tying a Tae Kwon Do Belt
- 4- Why Precision Matters in Tying Your Belt
- 5- Additional Tips for Mastering Belt Tying
1. The Importance of Tying Your Tae Kwon Do Belt Correctly
In Tae Kwon Do, the way you tie your belt isn’t just about practicality – it’s also a symbol of respect, discipline, and your journey in martial arts. Each belt represents a milestone, and tying it properly demonstrates attention to detail and respect for the traditions of Tae Kwon Do. While it may seem like a simple task, mastering the correct way to tie your Tae Kwon Do belt is an important skill that all practitioners should learn early on.
Additionally, correctly tied belts ensure that you stay focused during training and competitions, without distractions from an improperly fastened belt. For beginners and advanced practitioners alike, a properly tied belt also symbolizes your commitment to the martial arts journey.
Kwak’s Taekwondo / kwak taekwondo
Blue BellMontgomery CountyPennsylvania
1510 Dekalb Pike, Blue Bell, PA 19422, USA
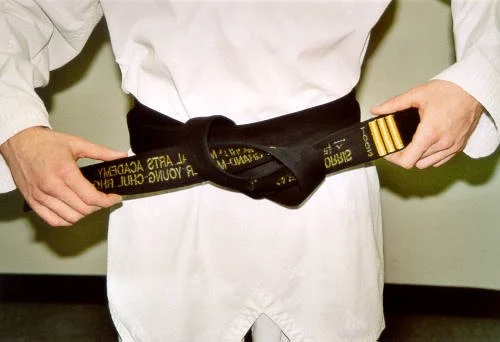
2. Step-by-Step Instructions on How to Tie Your Tae Kwon Do Belt
Now, let’s walk through the steps on how to tie your Tae Kwon Do belt. Whether you’re just starting out or need a refresher, these instructions will help you master the art of belt tying.
- Step 1: Position the Belt – Start by placing the center of the belt at the front of your body, so the two ends are equal in length on either side. The center of the belt should rest at the navel area.
- Step 2: Wrap the Belt Around – Take both ends of the belt and wrap them around your waist. Make sure they stay even as you go around.
- Step 3: Cross the Belt Ends – Cross the right side of the belt over the left side (or vice versa, depending on preference). Pull tightly to make sure the belt fits snugly around your waist.
- Step 4: Tuck Under – Tuck the top part of the belt under the loop you’ve created, ensuring it’s neat and tight.
- Step 5: Final Knot – Finally, pull the belt’s ends to make a firm knot. The left side of the belt should be on top of the right side when you tie the final knot.
- Step 6: Adjust for Neatness – Ensure the ends of the belt are even and aligned properly. The knot should sit centered and tight. You are now ready for training!
3. Common Mistakes When Tying a Tae Kwon Do Belt
Even with step-by-step instructions, many practitioners make a few common mistakes when tying their Tae Kwon Do belts. Here are some errors to watch out for:
- Uneven Belt Lengths: One of the most common mistakes is not adjusting the belt to be even on both sides before wrapping it around your waist.
- Loose Knot: A loose knot may seem like no big deal, but it can easily come undone during practice or competition, which can be distracting.
- Incorrect Belt Placement: Positioning the belt too high or too low on the waist can lead to discomfort or affect the way it stays tied.
- Improper Overlap: Some people cross the belt incorrectly, leading to an uneven knot. Always ensure the left side is on top when tying the final knot.
4. Why Precision Matters in Tying Your Belt
In Tae Kwon Do, attention to detail is key, and your belt is an outward symbol of this discipline. A precisely tied belt shows that you take your training seriously. It reflects your commitment to not only your practice but to the broader traditions of martial arts.
Additionally, a neatly tied belt prevents distractions during training, keeping your focus where it belongs – on your movements and techniques. A uniform and tidy appearance is also important when performing forms or participating in tournaments, as it shows respect for the art and others in the dojo.

Motivate Martial Arts / motivate martial arts monroe ga
768 W Spring St, Monroe, GA 30655, USA
5. Additional Tips for Mastering Belt Tying
Now that you know the basics, here are a few additional tips to perfect your belt-tying technique:
- Practice: Like any martial arts technique, practice makes perfect. The more you tie your belt, the faster and more precise you’ll become.
- Use the Right Length: Make sure the belt is the right length for your size. A belt that’s too long or too short can be difficult to tie and can also look sloppy.
- Keep It Tight: Make sure to pull the belt tight each time. A loose belt will come undone faster and will be uncomfortable during training.
- Learn from Others: Ask your instructor or fellow students to demonstrate their technique. Seeing how others tie their belts can give you helpful tips and tricks.
For more tips on Tae Kwon Do training and martial arts accessories, visit Jeuns TKD Hub for products that will support your journey in the sport.
 O2 Martial Arts Academy4.0 (19 reviews)
 Mr. B’s Taekwon Do, LLC4.0 (20 reviews)
 J Torres Taekwondo Academy5.0 (6 reviews)
 Bucks County Okinawan Karate0.0 (0 reviews)
 Solomon Karate5.0 (16 reviews)
 OSA Martial Arts-Burke4.0 (10 reviews)
 How to Execute a Jumping Roundhouse Kick to the Head
 How to Execute a Double Kick Combination in Sparring
 How to Perform a Flawless Axe Kick: A Step-by-Step Guide
 DIY Tae Kwon Do Training Equipment for Home Practice
 How to Increase Your Vertical Jump for Tae Kwon Do Flying Kicks
 The History of the Tae Kwon Do Peace Corps